mandag den 28. februar 2011

Quick NOTD: Here Today.. Aragon Tomorrow suede

Hey girls!

I've been super busy today, been to school and looting from my local drugstores. GOSH make-up were reduced 40% so I had to hoard a few extra of Holographic for Summer, and I also bought something else I've been experimenting with today, which I'll feature soon in a post.. Franken style!

I forgot to take a bottle picture of the beauty I've been wearing for the past 3 days. In fact, I'm still wearing it, as I love it so much! Even my dad complimented it, LOL, I think he like the subtleness for once x) Here's a mani shot I did when I applied it ~

OPI Here Today.. Aragon Tomorrow Suede
Besides for some minor chip wear, it looks pretty much the same today ♥ I love it so much!

I used my regular basecoat, 2 coats of Aragon Tomorrow (and added a coat of Essie Matte About you to prolong wear, after the pics were taken. It didn't make any difference to the finish IMO). This polish is special to me, because LOTR has a special place in my heart ♥ The colour reminds me of the brooches the fellowship wears in the movie. It kind of makes you feel like part of the gang, right? LOL, maybe that part is just me! All that aside, the polish is pretty darn gorgeous! Shimmers look super pretty with a matte finish.

I've been thinking about doing a theme week (as I loved Ulmiels Illamasqua week). What would you guys like to see? I can do a brand theme, a colour theme, finish theme... You name it! 

♥ Vetten

lørdag den 26. februar 2011

Nailtopia Dried Flower Stickers : A review

Hey guys! Hope you're having a splendid Saturday :) I'm taking it slow as I'm recovering from a day in bed. What better way to take it slow than to sit and play with nail polish?

Nailtopia Hot Mix Dried Flower Stickers
Today I'd like to show you some cute flower stickers I received from Nailtopia to review. These are available in lots of different colour combinations - the one I received is called Hot Mix and is a mix of hot pink, light pink, orange and yellow flowers. The sheet is divided into two - with two different colour combo's; hot pink, light pink & orange, the other combo is hot pink, orange and yellow.

I like the design of these - they are designed as a substitute real dried flowers - and personally, I'd much rather use stickers than the real deal as they can be a bit thick and bumpy.

Like the other products I have from Nailtopia, these are made of rubbery plastic so they are quite flexible. Unlike the Alice in Wonderland stickers, they are a bit see-through - which means they are best suited for light base colours. While I prefer opaque stickers, these are still too cute to resist ;)

I decided to do an accent nail - I don't think I'd be able to pull a manicure off with these on every nail. I am sure these would look stellar on a Summer pedicure, even on all my toes, so I will definitely save some for Summer ♥

As my base colour, I used 3 coats of Sally Hansen Gentle Blossom. While the polish felt dry, I soon learned otherwise when I applied the stickers - so there's a bald spot underneath the orange one. Ooops! Hopefully it won't be an eyesore to you as it is to me ;)

Sally Hansen Gentle Blossom + Nailtopia Dried Flower Stickers

All in all, I'm very satisfied with these stickers - the only thing I think could be improved would be making these opaque (it would make layering a bit prettier too, IMO). It's not a big enough bother for me to not use them though!

Have a great weekend!

♥ Vetten

(these were sent to me for an honest review)

torsdag den 24. februar 2011

Gallimimus Greyn (Franken)

It's time to flash a franken I've been working on for a while! I wore this a few days ago, as I wanted to test the wear (and formula) before writing about it. It also proved to be incredibly hard for me to photograph, so the manicure pictures do not do it justice *sigh*.

Gallimimus Greyn
It's no secret that I love dinosaurs ♥ They are a great inspiration when I'm creative - this goes for polishes and drawings alike.

Gallimimus Greyn is another franken with dinosaur theme. This time it took me a while to find a fitting name (my ever so supporting boyfriend had to help me again LOL), I wanted the name to fit the colour and the dinosaur to fit it as well. Gallimimus might not be well known, but it's worth a google if you haven't seen it before (well, neither of us have - but you know, illustrations and the like).

Gallimimus Greyn is made with a bunch of different colours - my goal was to make a creamy khaki holo, that would also look good without sunshine. The result? A grey khaki creme, lots of shimmer with very sporadic holo particles in direct sunlight. I like it, though - this type of shimmer is my favourite :)

I had to use two coats for opacity - the formula is easy to work with, though I wish I had used another bottle with a better brush! It was terrible. I slapped on a hand drawn Galli on the bottle for the fun of it ;)

I took a lot of pictures of this polish in all sorts of lights. It's incredibly hard to capture, and I'd say the RL colour is a bit lighter than the colour in the pictures.

I made a mosaic to show you this colour in a bunch of different angles - and the last picture with with a little scotch tape (inspired by the scotchtape goddess Erika), and Catherine Arley 676, I believe. The daylight picture is the best I can show you how the polish looks most of the time - with silver shimmer. Sadly, topcoat took away the possibility of seeing even the slightest hint of holo, as you can see in the same picture.

Gallimimus Greyn - different angles and with different light sources.
This is how I like it the best - no topcoat and a heavy flash from my camera to pick up holo sparkles! I wish it looked the same in everyday light ;)

Gallimimus Greyn
Not all frankens turn out the way I want them to. Gallimimus Greyn is a bit fail, even though I like the colour, it's just not what I wanted. My quest for a good recipe to make a holo khaki is still on, LOL. Maybe I'll skip the creme part next time.

♥ Vetten

onsdag den 23. februar 2011

Lippmann: Glitter In The Air

Having finally beaten my headache/migraine (sometimes it's hard to feel where one ends and the other begins), I kicked myself off the couch to try out a new polish I got yesterday... One that I loved immediately when seeing it on to-be-released posts.

Deborah Lippmann - Glitter In The Air
The polish I'm talking about is Glitter In The Air, just released by Deborah Lippmann. Lippmann is famous for her amazing, one of a kind glitters crammed with big and small hex glitters in a jelly base. 

These polishes are some of my very favourites - I don't wear them often, granted, but I treasure them dearly and save them for a day that needs something extra.

Glitter In The Air is not like the most of Lippmanns glitters - I knew as soon as I saw the bottle pics that it wouldn't be as dense as most of her glitters. The base looked creamy, on the sheer side, and I was prepared for this. If you want GITA (what a pretty abreviation) because you like dense glitters from Lippmann such as Across The Universe and Bad Romance, you're going to be very disappointed. Do not expect the consistence to be the same - just sayin' ;)

Personally, even though I adore my Lippmann glitters and doubt I could ever grow tired of new being released, I'd find it boring if dense glitters were the only kind of glitters Lippmann would make. In my humble opinion, I think she's given the polish world something amazing - her collection doesn't consist of 1000+ polishes (as I suspect OPI's does, LOL), yet she managed to contribute with some of my all-time favourites and some very unique polishes. Across The Universe is perfection. For all I know she could've continued making dense glitters in different colour combos until people would throw up rainbow glitter. I see Glitter In The Air as Lippmanns attempt to give us something new - in lack of better words, a lightweight glitter for Spring. I think she's trying to give us something new again, and I must say that I love it. In my book, GITA is a winner.

Here's a close-up of the bottle ~

Deborah Lippmann - Glitter In The Air - closeup

I'm sorry for the wall'o'text, I just feel like protecting this amazing polish like a newborn baby, LOL. It needs the love! Enough ramblings ;)

For this manicure, I used my basecoat, NailTek II, 2 coats of China Glaze Sea Spray, 2 coats of GITA and one coat of Fast Forward. I think two coats of GITA is perfect - I admit you have to move a few glitter particles around to be satisfied. It doesn't bother me, though, as long as the end result is worth it.

And it's worth it, I think ♥

Deborah Lippmann - Glitter In The Air (GITA) on China Glaze Spray
I don't think two coats is that far away from the mani I had in mind from the promo shots ♥ I love this polish for it's uniqueness, its softness, not to mention the perfect match for Sea Spray (another way to wear one of my fav shades right now) and the fact that Lippmann has the balls to make a new kind of glitter instead of making the same type in different colours.

I'm very excited to hear your opinions about this polish :) Did you dislike the polish from the beginning? Are you disappointed with GITA, did you expect it to be like the other glitters from Lippmann or are you as much in love as I am?

♥ Vetten

mandag den 21. februar 2011

China Glaze - Sea Spray

While I'm sure many of you are getting tired of seeing the Anchors Away collection, I hope you can bear with me ;) In general, I'm a bit late with most collections. It takes time for the bottles to travel all the way to Denmark, and even longer before I get to them in my never-ending stash of untrieds! Besides, I never buy a polish because it's "in", or just because I want to flash it while it's new, so all my polishes are equal in that matter - I wear what I feel like, not what the current trend tells me to. Of course I'm influenced (and tempted) by all the new shades in each collection, but then it's because of the colour itself and not the in-factor. I'm sure most of us feel that way :)

China Glaze - Sea Spray
I was really looking forward to Sea Spray, all the swatches around the blogs had me swoon over the gorgeous yet hard to describe grey-blue shimmer. I'm not sure if it's a baby blue with grey in it, or a light grey with blue in it. In the end it doesn't really matter, does it? Sea Spray didn't disappoint me in real life; it's a really gorgeous colour.

The shimmer in Sea Spray is amazingly hard to capture. I gave up trying, but you might be able to see some teeny tiny shimmering particles in the picture, but don't despair if you don't - it's not that visible IRL either!

When I received Sea Spray I immediately thought of another blued grey I have from a brand called Nilens Jord - swatched here. While #666 from Nilens Jord is definitely a lot darker, they share some resemblance - they both have subtle shimmer and the blue tone. I think they'd work amazing together in a manicure, so I will have to try those together one day :)

I used one coat of my base coat NailTek II and two coats of Sea Spray. I didn't use a top coat as I was playing with Black Shatter :)

While I'm very satisfied with the colour and opacity of Sea Spray it does bring out the red in my skin tone :/ I really wish it worked better with my colour, but I will still be using this colour a lot - I will have to make it work ;) Ever felt this way about a polish?

For once I didn't take the manicure-picture in my lightbox - the sun was shining bright and I was desperately trying to capture that elusive shimmer!

China Glaze - Sea Spray

What's your thoughts about Sea Spray (and all it's cousins from other brands)? Are you excited about China Glaze's Anchors Away collection? As for me, I didn't find too many I couldn't live without - but colours like Sea Spray are worth getting a spare bottle of, so my wallet is happy about that fact :) In general, it seems like greyed out colours are here to stay, and I'm thrilled with it! 

♥ Vetten

søndag den 20. februar 2011

Pssst.. wanna win these? CA holo swatches

As soon as the sun started showing today, I knew I had to do swatches of some of my Catherine Arley polishes. I have a lot of them, but today I'll be showing you two featured in the giveaway - so you know what you're entering to win! :)

CA #676, 3 coats, no topcoat, sunlight. Excuse my lobster-looking hands, it was freezing!

Let's start with #676, a silver holo. I used three coats for this picture, and as you can see it is very sheer. I recommend it as a holo-topcoat, using a silver as base if you want it to look remotely like in the bottle, or just plain use it for frankens! It's always fun to holofy a franken! :)

Next up is #666:

CA #666, two coats, no topcoat, sunlight

Two coats. This is more like it! While it was definitely sheer in indoor-light, I think it could be totally opaque in three coats.

Hope you like the prizes as much as I do! :) Thanks for the huge number of entries and new followers; having a give-away is so much fun (and work, LOL! I write the entries with pen and paper - wish I was more computer savvy!)

♥ Vetten

lørdag den 19. februar 2011

NOTD: OPI Pink Me I'm Good

Hey guys!

First of, let me say welcome to my new followers :) I'm thrilled people are entering the giveaway, it must mean you like the prizes, right?

OPI Feelin' Hot-Hot-Hot! & Pink Me I'm Good
Today I want to show you a stunning pink OPI polish I won from Karens blog - OPI Pink Me I'm Good. It is a sheer pink polish crammed with gold glitter. I was so lucky to win this HTF shade along with Pink Of Hearts 2010, which I'll be showing you another day ♥ Both are polishes I've been wanting for a while, especially Pink Me I'm Good.

To the left is Feelin' Hot-Hot-Hot! and Pink Me I'm Good. I knew PMIG would be very sheer on it's own, so I decided to use a base colour to save on the gorgeous glitter. Fortunately, Feelin' Hot-Hot-Hot! is a dead on match :)

I started out with my NailTek Basecoat, then I applied 2 coats of Feelin' Ho-Hot-Hot!. I then applied one coat of Pink Me I'm Good and finished with my Fast Forward topcoat from China Glaze.

I like the result, but I think a bit of the magic touch disappeared when I decided to use a base colour. 
I must try this girly glitter again when my nails are ready for a sheer manicure ♥ ... Or I could use one coat base colour and two PMIG. Gotta love how different the results can be with different use of layers!

OPI Feelin' Hot-Hot-Hot! & Pink Me I'm Good
Looking at this picture, I really think it's time to shorten my nails. Some of them are starting to curve ever so slightly in the sides, and I *hate* that. I just wish I could wear this length without the curving/bending issue :/

Thank you so much for the amazing prize, Karen! I'm loving my new OPIs! :)

Enjoy your weekend!
♥ Vetten

torsdag den 17. februar 2011

CLOSED - Finally - it's giveaway time!

It's time for my first giveaway!

First up, let me thank each and every one of my followers and commenters for following my blog ♥ You're the reason I keep on having so much fun blogging :)

I meant to do a giveaway when I reached 25 followers, but some of the polishes I ordered for it arrived broken (isn't that just typical?!), and it got delayed while I found out what to do. Originally I would've thrown in more CA polishes, but alas, the seller was hard to work with and I ended up cutting my loss and settling for the three I already bought.

Let's look at the polishes I ended up with for this giveaway, shall we? :)


The prize consists of 5 polishes;
GOSH - Rainbow (missing name-tag sticker at the top)
GOSH - Bright Passion
Catherine Arley # 666 (purple holo)
Catherine Arley # 676 (silver holo)
Catherine Arley # 805 (black holo)

Edit to add swatches of CA - #676 (three coats) & #666 (two coats)

CA #676 (three coats) & CA #666 (two coats) - sunlight

All prizes have been bought by me with my ow money - no sponsored prizes. Please note that I was a doofus and mixed the CA polishes with my own - which means they might have been swatched once on a swatch wheel.

The giveaway is open internationally, and new followers are welcome too!

How to enter:
Send me an email at vetteliciouscontest@live.dk with the subject "vettelicious giveaway" the following information:
Your GFC follower ID (one entry)
Did you blog about this giveaway? (two entries)
Included giveaway in blogroll/seperate page (one entry)
Tweet about this giveaway (one entry)

This giveaway will end on March 10th.

*phew* I think that covers everything - if you have any questions, please leave a comment - and remember, in order to enter this giveaway you have to email me, not comment below ;)

♥ Vettelicious

(this contest can be altered/changed at any time if I feel it's necessary)

onsdag den 16. februar 2011

Nfu Oh #50 & China Glaze Grape Pop

Just a teeny post from me today with a simple manicure. I've been busy these past days, spending time with my mom and - unfortunately and unrelated - a few migraines.

Nfu Oh #50
Nfu Oh #50 is a flakie goody from my favourite flakie distributor. One day I'd like to have them all, not counting the yellows... Some of the polishes look alike, but they're all so different once you get them in your hands!


I found the consistence of #50 to be more dense and thick than the rest of my flakies, as a result it was kind of hard to distribute the flakies evenly on the nail. It's worth the work though ;)


It's a very sheer polish so I decided to use China Glaze Grape Pop as base. One coat for most nails, though a few hand bald spots and needed two. One coat of #50 and lastly one coat of China Glaze Fast Forward, and I was good to go!


I would love to try this over a dark, navy base another time, but alas, too many polishes awaits their 15 minutes of glory on my nails (LOL) and it will have to wait a while. ;)


Enjoy the pictures!

Nfu Oh #50 + China Glaze Grape Pop - flash

Nfu Oh #50 + China Glaze Grape Pop - flash (close-up)

(I'm sorry the last picture messes a bit with the frame... I try to keep them small but I'd rather show you a real close-up than the pics being too small!)

♥ Vetten

søndag den 13. februar 2011

Alice in Wonderland / Valentines manicure

Hey girls! Doing anything fun this weekend or on Valentines day? :)

Alice in Wonderland inspired stickers
I know Valentines day is an American tradition, and a lot of people in Denmark are against the concept of "adopting" the tradition seeing as it is mainly stores that wants us to spend money LOL. I like the idea behind Valentines day though (what can I say - I love any excuse to spend time with my loved ones and I love everything tacky!), and even though I'm not celebrating anything with my boyfriend, I figured I could do a manicure and celebrate in my own way ;)

I bought the stickers to the left from an internet store based in the UK, Nailtopia. I love Alice in Wonderland, I've always been a fan of the Disney cartoon (or the fake version I grew up with - I wish I could find it!), and with the movie released last year my love was rekindled.

I wanted a base that fitted both the red and black stickers, and thought it would be fun to use a red base for the first time. Yes, this is the first time I'm wearing a red polish! Ever! But, as I suspected, red alone isn't really me, so I found my black creme from WnW and some scotch tape :) Sorry if you think it's a bit tacky/boring I used the diagonal design again - I really like it and don't grow tired of it within a few hours as I do with funky french manicures. So be prepared to see a few of these in the future ;)

I used my new OPI Paint My Moji-toes Red as the base (after seeing it quite a few times on Neglenymfernes blog I decided it was the perfect red, and I wasn't disappointed). It covered nicely in one coat, then I used a coat of Fast Forward topcoat, then did the diagonal with scotch tape and my black creme, added another layer of Fast Forward, and then I was ready for the stickers! I used a layer of Fast Forward on top of the stickers to prolong the wear of them.

OPI Paint My Moji-toes Red + WnW Black Creme
For the first time in - well, maybe the first time ever - I decided to include a picture of my right hand of the end result :) It took me a while to paint properly with my left hand, but I think I got it now.

Right Hand            |             Left Hand
I'm thinking of cutting my nails short soon, but I feel like these long canvases are just too much fun to shorten, LOL! There's room for much more nail art :)

The stickers are really fun to work with, and again they're rubber-based so they can be stretched to fit (which was very nice with the note-thingy as I cut it a wee bit too short). All in all I'm very pleased with these and don't regret paying a little bit extra for some high quality stickers. It's a shame they're one-time use only though, as I'd love to wear Alice quite often :) I'd say there's enough for two manicures in one sheet.

♥ Vetten

fredag den 11. februar 2011

Review: Nailtopia nail strips and a flash of Teenage Dream from OPI

Today's post is going to be a bit picture heavy, but I hope you don't mind ;) I have a lot to show you!

China Glaze - Something Sweet & OPI - Teenage Dream
Firstly, a gigantic package arrived earlier this week and from the 20+ polishes I got I'll be showing you two of them today. For the glittery result you see below I used the two polishes to the left: China Glaze - Something Sweet and the glitter is my favourite from OPI's collab with Katy Perry - Teenage Dream.

I used two coats of Something Sweet and two coats of Teenage Dream. Teenage Dream is a very dense glitter, it's base is pink and very thick but still manageable. In my experience OPI makes some great glitters and TD is certainly one of them. I can see it being pefect for light, summery manicures and I will definitely be using mine more as the weather gets better ;)

I took a picture in my lightbox of the result and it really washed out the holo effect of the glitter, so I decided to do a blurry shot so you can see why this glitter is so amazing :) 


I'm pleased to say it's everything I dreamed about after seeing the promo pics/video last Winther. I had high expectations, but I was counting on it being necessary to use a base colour, so that doesn't bother me.

ChG - Something Sweet & OPI - Teenage Dream
My only issue with this is not the polish' fault.. I'm really disappointed to admit that this colour combination isn't "me" on it's own - it's a bit too sweet looking. In general, warm pastel colours doesn't fit my style or skintone, so I usually steer clear of pale purple and pink, but I wanted this to work so hard that I took the chance anyway. I'll be trying it with a darker base next time, perhaps a dark purple or blue.

Anyway, I wasn't going to give up with this manicure. To my luck I had just bought a spare of my one-coat black creme - Wet'n'Wild Black Creme, and I received a package from Nailtopia with some products to review, and what better time to have some fun with stickers? :)

Here's the product I'll be reviewing:

Nailtopia Nail Strips Design LS-4

At 3.49£ a package, you get 3 x 30 cm strips. While I am usually very cheap when I buy nail stickers, I'd say this box is a good deal - I used approx. ½ of one strip, meaning there's enough for up to 6 manicures (depending on how many strips you want per nail ofc). And the quality is very good - they are self-adhesive and rubber-based, so you can stretch them very carefully if you cut them a few mm too short or just want the desired design to fit your nails. I was very impressed with this once I learned how to manage them with my clumsy fingers, LOL! And it's quite easy to measure how much you need, you can do this while the backing is still on.


Here's the result on my nails!

ChG - Something Sweet, OPI - Teenage Dream, WnW Black Creme & Nailtopia nailstrips
I love it! I topped it off with China Glaze Fast Forward to prolong the wear of the nailstrips/stickers. I'd suggest using two layers of topcoat if you want the sticker to be completely invisible, but since I'm already wearing 9 layers on my nails including all colours and base coat, I called it a day with one.

What do you think of Teenage Dream, and how do you like the design I made? :)

♥ Vetten

The nailstrips used in this post was received for review. This does not affect my opinion in any way.

torsdag den 10. februar 2011

Flakies - matte & shiny topcoat comparison

In my previous post about Nfu Oh #49, Rijah suggested I should try a matte top coat on the manicure to spice it up. After wearing #49 for approx. 3 days not getting tired of the gorgeous polish but tip wear was beginning to show, I decided to give it a go and used some scotch tape to see a comparison on the nail. :)

It's always been my opinion that the duo-chrome effect becomes less obvious with a matte top coat, and even though the flakies are still looking gorgeous, I'd feel I'd miss the duo-chrome effect with an entire matte manicure. Anyway, I took some pictures to show you - what do you think? Is it prettiest with shiny, matte, or the combination of both? While it does take away some shine, the duo-chrome is definitely still there - silly me ;)

I apologise for me holding a completely unrelated (but pretty) bottle - I just picked up the easiest to reach from my lightbox. Consider it a preview of my next manicure! Oh, and ignore the tipwear - I changed the manicure after the comparison. Yay for lazyness ;)

Nfu Oh #49 + ChG Fast Forward & Essie Matte About You - flash

And at a different angle, taken with daylight ~

Nfu Oh #49 + ChG Fast Forward & Essie Matte About You - daylight + lightbox
I used Essie - Matte About You for the matte half.

While the matte top does take away some of the effect, it also adds depth and some subtle, darker colours. I'd definitely wear the combination of matte and shiny, but if I can bring myself to matte the entire manicure, I'm not sure.

Thank you Rijah for giving me the urge to try this for real (and not just one nail for fun as I've previously done). :)

♥ Vetten

tirsdag den 8. februar 2011

Orange - green flakie heaven - aka Nfu Oh #49

Hey guys! Having a great week so far? I must admit I wish it was next week already LOL. I feel tired already, and some idiot at school made my Monday a rough one. Today has been great, and would've made a perfect start on the week (me being willing to forget about Monday), if not for a headache. This post might be a little short on info because of that. Feel free to shoot me some Q's in the comments ;)

Nfu Oh #49
It's time for another Nfu Oh :) I planned to make this entry yesterday but I wanted to take better pics so I had to do them today before work. I somehow failed to capture the duo-chrome effect at first shoot, how you can do that with these amazings I have no idea!

Nfu Oh #49 is a sheer orange base packed with gorgeous flakies. I want to try this over an orange-y brown one day, to see if I can get it to show the blue/purple effect that you can see to the left, but for now I can show you it layered over black.

I used my basecoat NailTek II, one coat Wet'n'Wild Black Creme, one coat #49 and lastly, my topcoat Fast Forward from China Glaze.

#49 is more dense than my other flakies, at least it felt so as I tried to manoeuvre the brush, making sure there was an adequate amount of flakies everywhere. It was almost a challenge not to get too many flakies on my nail, LOL, but I don't count that as a bad thing.

I wore this to class Monday and had such a hard time looking away from it; the light was PERFECT and I wish I had my camera with me (though I'm sure that would've labelled me as a loony LOL, or dare I say more loony than now? ;) ). Regardless, this is one of the polishes that will not disappoint on the nail - I admit that it looked like orange pee in the dull light whilst I opened the package the day it arrived.

Here it is pictured how it looks most of the time, the duo-chrome effect visible at all times. 

Nfu Oh #49 over black creme - lightbox, flash
And my favourite view; the green side! It takes this amazing (yes, I'm using amazing as a noun. These polishes are worth it!) to a hole new level of amazingness. I've said it before but will say it again: Nfu Oh = amazing. You get 17 ml of amazing and it will last forever if you use it as a layering polish. Some of the few polishes I can wear for days without getting bored with it.

Nfu Oh #49 over black creme - lightbox, flash
Oh, btw - these pictures are taken after two days wear. I've been working and going to school, but my manicure still holds strong, and I owe it to tip-wrapping with both the black creme and the topcoat. It really makes the difference if you want your polishes to last longer :) I believe it was the talented Ulmiel who wrote a post about it? Shout in the comments if you did! x)

That's all for today, I'm off to bed to fight off a headache I'm praying is not turning into a migraine. 

♥ Vetten

søndag den 6. februar 2011

Depend Crackle Effect - Red

This'll just be a quick post to show you the last of the four crackle effects I bought last week, made by the Scandinavian brand Depend :)

Crackle Effect polishes from Depend
The bright red crackle effect is the one I decided to wear as a full manicure when I was having fun with these.

While the thought of a red crackle intrigues me, the red effect from Depend is not the most opaque crackle.

While you can certainly make this work on black base colour, you will need a topcoat to pull it off - without it it will look like dried blood (brown red), and IMO that just doesn't look great. 

I took a comparison picture, and mind you - it looks redder/more orange-ish in the picture than in real life. I'm not exaggerating; I really think it looks like dried blood without top coat.

In general, this crackle was a bit fickle to get a good picture of - at least for me. 
Either the crackles wouldn't show up at all or the colour would be really off, so I used the best results for both with and without topcoat. I hope they're use-able ;)

I used one coat of base coat, one coat of Wet'n'Wild Black Creme and one coat of crackle for the shot on the left and added a coat of China Glaze Fast Forward before the right picture.

Red Crackle Effect from Depend, natual sunlight on the left (no topcoat) & flash on the right (with topcoat).

While I wish this crackle would've been more opaque and more visible from afar, I'm pleased with the result and will be using it every now and then. I just need some good red colour combinations - any ideas? And how do you like the red crackle? I know many people were excited about the red version (as was I, since it's quite a bold colour), did it disappoint or are you still psyched about it?

Vetten

lørdag den 5. februar 2011

Depend Crackle Effect - swatches (blue, purple and pink crackle)

Crackle polishes are really in this season. Isadora and Barry M released crackle polishes Fall/Winther 2010 and this spring we are seeing crackle polishes from many companies - such as OPI, China Glaze, Isadora and Depend. 

Depend Crackle Polish
Today I'll be showing you three of four crackles I got my hands on last week from Depend - I went to a store carrying the brand and when I saw the display it was already half empty. 

White and black crackle was gone, there was one pink left but oddly - the most interesting colours were still there! I already have a black crackle from Barry M and plan on getting the entire collection from China Glaze when it releases, so I can honestly say I was super psyched about getting a pink, red, purple and blue effect crackle ♥ 

While crackle is not something I'd wear every day, I'm sure I'll be using the lighter shades (and pair the darker ones with lighter shades) this summer - I think it really stands out in the sun. I was lucky enough to catch a few sunbeams today, so I can show you these in their full glory.

I wanted you to see them on both a dark base and a light, so I used Wet'n'Wild Black Creme for the first swatch and GOSH Gypsy Blue, Depend purple and Depend white for the last swatch.

Depend crackle polishes - left is on dark base without topcoat, right is on light base with China Glaze Fast Forward. Natural sunlight.

As you can see, they are quite different on dark/light base colours! 

Blue Crackle
The blue crackle is packed with gorgeous shimmer that really glows with a topcoat. Unlike the P2 silver shimmer crackle polish I bought in Germany (which was a pain to work with), this one has a great formula and it was easy to apply in an even layer. It looks amazing on both light and dark base colours - and it's quite a unique shatter since it's got shimmer. If you must pick out one of these, this one's definitely the most unique.
Purple Crackle
Purple is the most opaque creme of the ones I have, and again the formula was great. I love how subtle the purple is on black - it's definitely a combination I'll be using for an entire manicure, and the pale purple/dark purple combination? Perfect for a sunny day this Spring!
Pink Crackle
I don't like how the pink crackle looks on white, so I will have to try out a few other colour combinations for that one. It's a bit more sheer than the rest and the formula is a bit thinner too, making it is a bit see-through on black (but still looks great if you ask me). Even though it has a thinner formula, I still find it easy to work with.

In general I am very happy I got a chance to buy these before they sold out. Best 5-6$ I've spent on mini polishes (each) for a while! If I find the white one I will pick it up, as Depend makes some great opaque whites.

What is your opinion on crackle polishes - and what do you think about the colours from Depend? :)


♥ Vetten

fredag den 4. februar 2011

Nicole by OPI - My Lifesaver

Today I'll be showing you a colour that has been keeping my nails bright for 4 days without a single chip. Granted, there is a little tip wear but I haven't used topcoat since the original manicure to try and protect it, so I didn't expect otherwise.
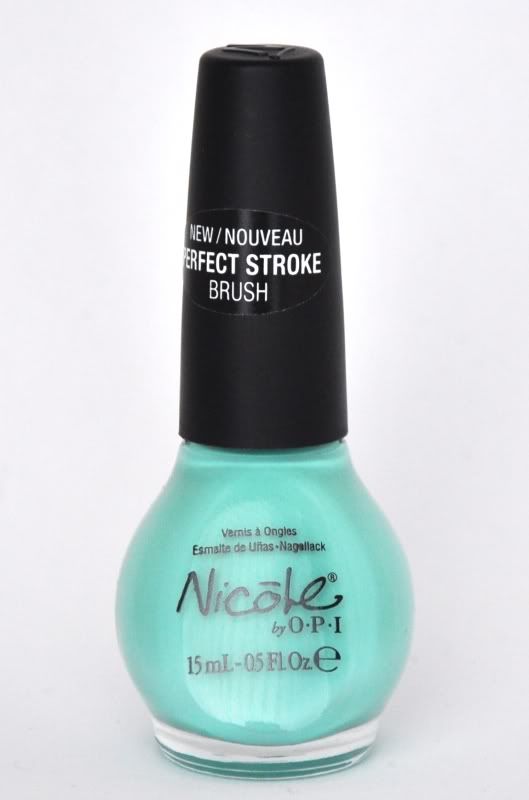
My Lifesaver
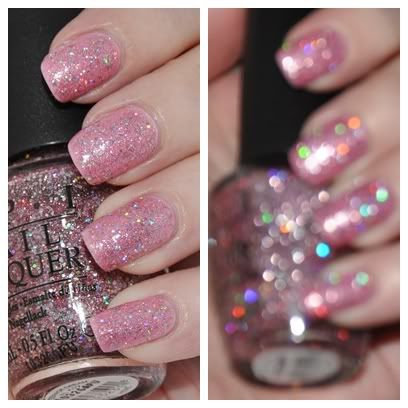
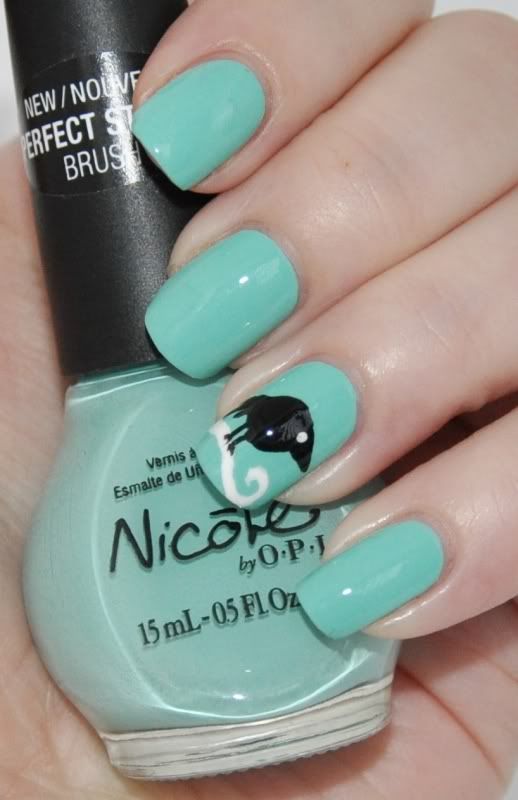
The colour in question is My Lifesaver - recently released from Nicole by OPI. It's my first NbOPI, and aside from the brush that was crooked (factory flaw), this polish has been an absolute joy to wear. The store in which I bought it said they'd happily replace it with a new bottle with a perfect brush, so I'll be going back next week to get a perfect bottle.

In general I'm not so fond of the bottle - I think the OPI bottle is a little bit more beautiful - but it's defnitely not the worst design out there.

I'm almost embarrassed to say that this colour was a collaboration with Justin Bieber - I feel like a fangirl and being a tween all over again. Rest assured that I bought this polish for the colour! ;)

Now, how would I get access to this colour, living in Denmark where most people haven't heard about OPI, China Glaze or other amazing brands? 


A chain of stores that sells furniture, home accessories, clothing, jewellery and like recently began to carry OPI lacquers. I checked their range, and it was a little sad looking - 6 Burlesque colours and some bestsellers, but I hadn't expected more to be honest. And the price was as I had feared; almost, if not 3 times as expensive as OPI lacquers is in the US. Needless to say, I was thrilled OPI was beginning to appear in smaller danish stores but I didn't buy any for the time being. 

Last week I decided to check if they were getting the Katy Perry collection, as I badly want the two glitters from that collection (which they hadn't by the way), and there it was - a gorgeous, bright creme staring at me. 

My Lifesaver.

It looked odd; there was six bottles crammed into the OPI display, the bottles not fitting in the display were kind of stuck and I had to fight with it to get it in my hands. I asked the clerk if they were getting other NbOPI colours, but she said she didn't know for sure but wasn't expecting any new colours apart from these. I guess it's the store chain that decides which colours they carry, and they hit the nail by deciding to order this baby ♥ Seeing as the Justin Bieber collection is expensive on Ebay, I decided it was worth it to buy in the store. I also feel good supporting the arrival of OPI in small towns like mine.

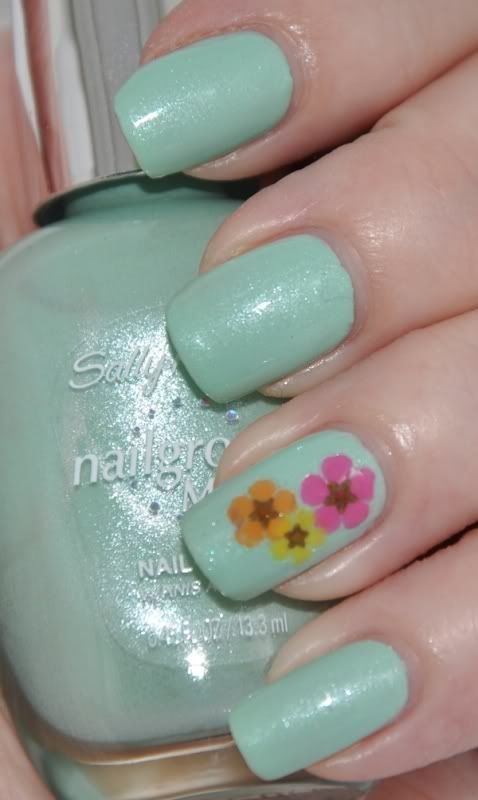
My Lifesaver - lightbox, natural light + flash

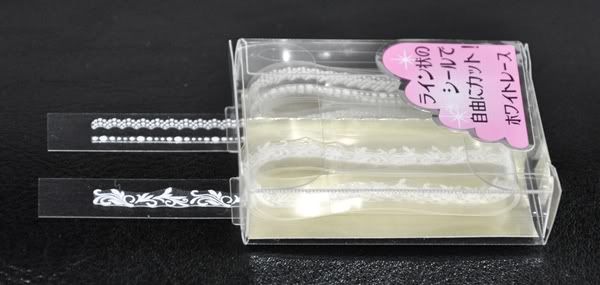
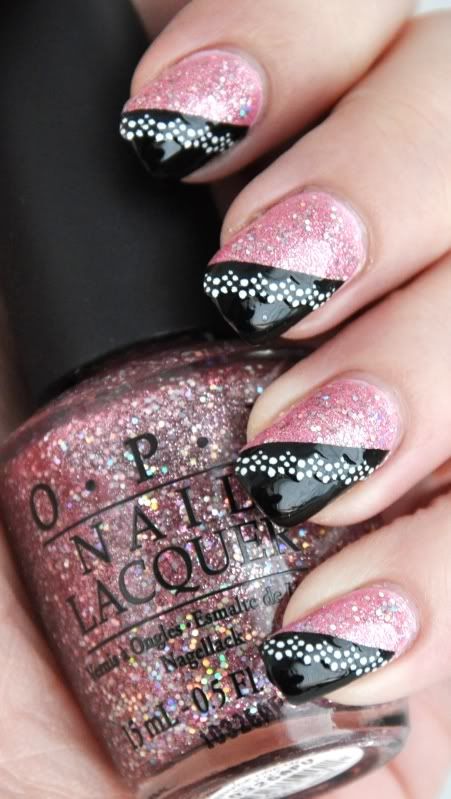
This gorgeous mint is opaque in two coats. By the look of first coat it looked like it would need three, but the second coat covered all bald spots. I drew the blackbird with a small brush and black and whit stampy polish from Essence. I used a layer of China Glaze Fast Forward to finish it, as the polish is a bit thin and you could see ridges and the like without a topcoat.

This will without doubt (unless another bright mint comes around with an even better formula), be my go-to mint this Spring/Summer ♥ It is so beautiful, bright and long lasting.

♥ Vetten

tirsdag den 1. februar 2011

Kiko #255 Purple Microglitter

Today I want to show you a fantastic purple combination. I'm loving this simple, quick manicure so much that I'm thinking about wearing it forever! If only I could lol, I know temptation is just a corner away ;)

CG Grape Pop & Kiko #255
Quite a while ago my friend in Germany bought some KIKO nail polishes for me - this was one of the ones I was most giddy about, and I finally reached for it and decided to give it a go.

The reason I hadn't done so earlier, is that I needed a good, purple base and the ones I had were too cold. Having recently purchased China Glaze Grape Pop, I tried to match them - while Grape Pop is still a tad on the cold side, I found that it doesn't matter as #255 warms it up anyway. I guess I finally learned it doesn't really matter unless the top colour is a very sheer polish!

The picture on the left shows #255 way too cold, but I had trouble finding the true hue in my lightbox (and in all kinds of light, actually. My camera doesn't seem to want to pick it up). That's also why I decided to include a non-light-box picture of the result, as the true colour is closer to that than on the first pictures.


As much as I love this polish, I'm really disappointed it doesn't have a proper name. I'm bad with numbers and had to reach for the bottle in order to write this post - and this polish is in my top 20! On Kikos website, it's described as Purple Microglitter, which will be it's name until I can think of a better nickname for this pretty. God knows it deserves it!

I started with one coat of basecoat, Nailtek II, added one coat of Grape Pop, then one coat #255 and lastly tried out my new top coat, Fast Forward from China Glaze, which I'm very impressed by. I will do a post about my basic stuff one day, but for now let me just say that it's a great substitute to Seche Vite.

I wanted to limit myself to one picture of the result as I do most of the time, but I found it so pretty that I couldn't narrow it down from the last two. I also added a picture taken in yellow evening light, to show you how warm this purple really is.

Kiko #255 - Purple Microglitter, natural sunlight

Take one look at the amazing sparkles on my ringfinger and tell me you're not in love ♥

Kiko #255 - Purple Microglitter, natural sunlight - close-up.
And lastly, a picture to show the warm purple it flashes most of the time ♥

Kiko #255 - Purple Microglitter, artificial yellow light - close-up.
Holographic sparkles made my day! A real pick me up when I needed it. This'll be my go-to colour for days where I need that little smile ;)

I sure hope this post wasn't too long for ya, kudos if you made it to the end :)

♥ Vettelicious